Sioux War of 1876-1877
|
The Sioux War of 1876-1877 The Reservation System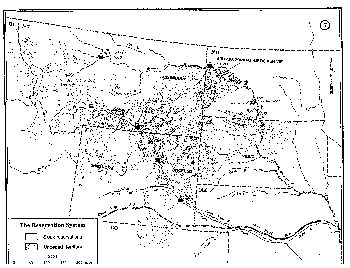 The Sioux War of 1866-68 clearly established the dominance of the Oglala Sioux over U.S. forces in northern Wyoming and southern Montana east of the Bighorn Mountains. The treaty of 1868 between the Sioux nation and the United States thereby recognized the right of the Sioux to roam and hunt in the areas depicted in gray on the map. This territory was called unceded in recognition of the fact that although the United States did not recognize Sioux ownership of the land, neither did it deny that the Sioux had hunting rights there. The treaty also established a reservation in Dakota Territory wherein "the United States now solemnly agrees that no persons except those herein designated and authorized so to do ... shall ever be permitted to pass over, settle upon, or reside in the territory described in this article ... and henceforth the [Indians] will, and do, hereby relinquish all claims or right in and to any portion of the United States or Territories, except such as is embraced within the limits aforesaid, and except as hereinafter provided." This provision clearly established the solemn rights of the Sioux to perpetual ownership of the reservation. In the spring of 1874, General Philip H. Sheridan, commanding the Military Division of the Missouri, directed his subordinate, Brigadier General Alfred H. Terry, commanding the Department of Dakota, to send a reconnaissance party into the Black Hills to ascertain the suitability of establishing an Army garrison there. This reconnaissance party, commanded by Lieutenant Colonel George A. Custer, not only determined the adequacy of the ground for a garrison but found evidence of gold. The news flashed through the nation, triggering a gold rush to the Black Hills of what is now South Dakota. The difficulty was that the Black Hills region was squarely inside the territory reserved to the Sioux in the treaty of 1868. But no American government, no matter how progressive, would have attempted to restrain such a great number of citizens in their pursuit of happiness (as manifested by their dreams of gold). The predicament faced by President Ulysses S. Grant was that he could not prevent Americans from entering the Black Hills; at the same time, he could not legally allow them to go there. Rationalizing an excuse for war with the Sioux seemed to be Grant's only choice to resolve the matter. If the government fought the Sioux and won, the Black Hills would be ceded as a spoil of war. But Grant chose not to fight the Sioux who remained on the reservations. Rather, he was determined to attack that portion of the Sioux roaming in the unceded land on the pretext that they were committing atrocities on settlers beyond the Indians' borders. Accordingly, Grant ordered the Bureau of Indian Affairs to issue an ultimatum to the Indians to return voluntarily to their reservation by 31 January 1876 or be forced there by military action. There were two categories of roamers outside the reservation, most of whom ignored the ultimatum. One category, called winter roamers, spurned all sustenance from the white man and lived in the unceded area. Those in the other category, called summer roamers, took the white man's dole in the winter but pursued their old ways in warmer weather. When Sheridan received the mission to mount a campaign against the Indians in the unceded area, he believed he would be fighting the winter roamers only. As the weather turned warmer, however, the number of summer roamers grew in the unceded area, creating a greater threat to the soldiers. Sheridan's Campaign Plan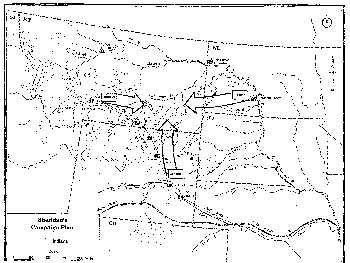 Professional military officers of the 1870s held several assumptions to be fundamental truths when fighting Indians. First, they believed that the Indians would not stand against organized forces; in any situation where U.S. forces met Indians-no matter the numbers-the Indians would run. A second belief was that the Indians would never seek battle with U.S. troops unless the soldiers were in proximity to their villages. Finally, officers were convinced that even the meager opposition ordinarily offered by the Indians would be greatly reduced in the foundation of these assumptions, Sheridan formed his campaign plan. Sheridan directed Brigadier General Alfred H. Terry, commanding the Department of Dakota, and Brigadier General George Crook, commanding the Department of the Platte, to find and defeat the Indians. Sheridan's communications with his generals clearly indicate that he wanted to conduct the campaign in the winter, catching the Indians in their worst circumstances. Unfortunately, the orders to these coequal department commanders specified no overall commander for the operation, nor did they even specify coordinating instructions between the two. Sheridan's own words in his annual report demonstrate the sparse attention he devoted to coordination: "General Terry was further informed that the operation of himself and General Crook would be made without concert, as the Indian villages are movable and no objective point could be fixed upon, but that, if they should come to any understanding about concerted movements, there would be no objection at division headquarters." There was a practical consequence to Sheridan's vague instructions. Terry instructed Colonel John Gibbon, his subordinate commanding the District of Montana, to gather all his scattered detachments and begin a march from the west. Terry himself would command a column moving from the east. Each of these forces was to follow the Yellowstone River and unite. Meanwhile, Crook was to form his own column and march from the south. Together, all these separate operational plans constituted what has commonly been referred to as Sheridan's campaign plan, and indeed, all of them flowed logically from his instructions. However, the final pincer movement was never clarified in any set of orders. Sheridan's disregard for coordination between,his separate columns provides some indication of his contempt for the fighting capabilities of the Sioux. It was a contempt that would lead to ineffective combat operations throughout the winter and well into the summer of 1876. Crook's March to the Powder River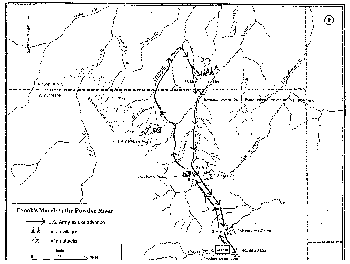 Brigadier General George Crook was the first to embark. Anticipating the coming campaign, he secretly had been gathering units from scattered posts throughout his department. When the order to fight came, he was nearly ready to start his northward march from Fort Fetterman (near Douglas, Wyoming), Crook's troops marched out on 1 March 1876. The weather was crystal clear and bitterly cold. Having placed Colonel Joseph J. Reynolds in command of the column, Crook was nominally an observer. Crook, however, retained practical control, and Reynolds was largely a supernumerary. Marching with Crook and Reynolds were ten cavalry companies, two infantry companies, and sixty-two civilian packers. These units, plus Crook's staff, the guides, and reporters, totaled 883 men. Crook, a master of efficient and effective pack trains, had his column well prepared for its winter campaign. Trouble began almost immediately. Indian spies were spotted every day, and the frequency of smoke signals suggested to the soldiers that their advance was being observed. On the second night out, the Indians successfully stampeded the livestock herd, depriving the troops of their only source of fresh meat. On 5 March, the Indians boldly staged a raid against the soldiers' camp. Finally, Crook tired of marching under the watchful eye of the Indians. On the morning of 7 March, he ordered the infantry companies to make a great show of marching back to the abandoned Fort Reno site (near Sussex, Wyoming) with the trains. The cavalry, stripped down to minimum subsistence for fifteen days, would bide on the day of the 7th and resume its march that evening. The ruse worked; the ten cavalry companies escaped the Indian spies and roamed unnoticed for the next ten days. The problem was that Crook and Reynolds could not find the Indians. Finally, Frank Grouard, the most knowledgeable of the scouts, suggested that while the cavalry was searching along the Tongue River, the Indians likely would be sheltered in the Powder River valley. Crook accepted Grouard's opinion and had him guide the force to the Powder River. True to his word, Grouard found signs of a village just north of present-day Moorhead, Montana. Crook now detached Reynolds (putting him truly in command of a combat expedition) with six companies of cavalry and most of the scouts. Grouard, exhibiting brilliant scouting, led the detachment through a blizzard to the vicinity of a Cheyenne village. The circumstances were now right for Crook to strike the first blow in the 1876 Sioux War and for Reynolds to display his prowess as a combat leader. Reynolds' Battle on the Powder River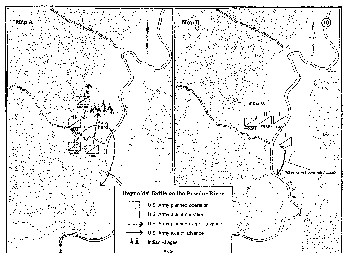 Reynolds sortied from Crook's command with three two-company battalions of cavalry: E and M Companies, 3d Cavalry, commanded by Captain Anson Mills; I and K Companies, 2d Cavalry, commanded by Captain Henry E. Noyes; and E Company, 2d Cavalry, and F Company, 3d Cavalry, commanded by Captain Alexander Moore. Also accompanying the expedition was Lieutenant John Bourke, Crook's aide-de-camp, who joined the detachment as Crook's observer, Most of the scouts also went with Reynolds. This was a discontented command; the officers had no confidence in their commander's tactical abilities nor his physical and moral courage. Perhaps it was a self-fulfilling prophesy, but Reynolds proved true to the low esteem in which his officers held him. Through driving snow and temperatures that ranged as low as 80 degrees below zero, scout Grouard literally felt his way along the trail that led to the Powder River. At about 0230 on 17 March, he halted the column until he could locate the Indian village. While the troops waited in the bitter cold, Grouard successfully pinpointed the Indians' location. This was the grand opportunity to strike the Indians that U.S. commanders had been awaiting. Reynolds' attack orders were inexact, but he did issue a general outline of his tactical plan (see map A). Captain James Egan's company of Noyes' battalion was to approach the village quietly and assault it upon being detected. Meanwhile, Noyes and his remaining company would drive the Indian pony herd away from the village. On its part, Moore's battalion was to dismount and move to the bluffs overlooking the village to support Egan's assault. Mills was initially given no mission, but eventually, Reynolds had him follow Moore to assist where practical. Noyes and Egan moved into position and initiated the attack satisfactorily (see map B). However, Moore was not yet in position. Consequently, the Indians were able to flee to the bluffs that commanded a view of the soldiers now occupying the village. At this point, Egan's company was in great danger of being cut off, but Mills' battalion was soon available to reinforce it. When Moore's battalion belatedly entered the valley, it was added to the forces occupying the village. Noyes, who had successfully captured the pony herd, was resting his unsaddled horses when he was urgently ordered to join the fray in the village. Throughout the fight, Reynolds had become increasingly anxious about the safety and protection of his detachment. Fearing the loss of his command, he ordered the rapid destruction of the Indian village so that he could withdraw. Some Indian property was destroyed, but Reynolds' demand for haste caused much to be overlooked. During his return march, the Indians regained most of their pony herd. In exchange for four killed and six wounded troopers, Reynolds had gained virtually nothing beyond warning the Sioux of the government's intentions. Beaten and ashamed, Reynolds' force rejoined Crook at the mouth of Lodgepole Creek. Then, twenty-six days after its departure, the entire force returned to Fort Fetterman-- worn, weary, and defeated. Terry's and Gibbon's Approach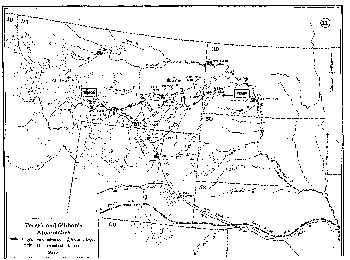 Colonel John Gibbon's column from the west was next into the field. Gibbon chose to gather his widely separated companies at Fort Ellis (near Bozeman, Montana). Accompanying him on his march from Fort Ellis between 1 and 3 April were 4 companies of the 2d Cavalry Regiment and 5 companies of the 7th Infantry Regiment, comprising a total of 450 men. After marching down the Yellowstone River and briefly halting at the camp supply to improve his sustainment capability, Gibbon arrived near the mouth of Tullock Creek. It was here that Crook's movements far to the south affected Gibbons actions. Since Crook did not plan to take to the field until mid-May, Brigadier General Alfred H. Terry ordered Gibbon to halt until his movements could be coordinated with the other columns. Thus, Gibbon waited at his camp between 21 April and 9 May. In this nineteen-day period, Gibbon sent out several reconnaissance patrols, most of which found no trace of the Sioux. However, in attempting to track Sioux horse thieves, Gibbon's remarkable chief of scouts, Lieutenant James H. Bradley, on 16 May pinpointed the location of a major Indian village on the Tongue River. Upon learning of Bradley's find, Gibbon ordered his command to march down the Yellowstone, cross to its south bank, and attack the village. Unfortunately, Gibbon's men proved unequal to the task of crossing the Yellowstone. After unsuccessful efforts lasting one hour, Gibbon canceled both the movement and the attack. Following this abortive attempt, Gibbon reported to Terry neither Bradley's finding nor his own failure to cross the Yellowstone. Meanwhile, this large Sioux village continued to send parties of warriors to harass Gibbon's camp until 23 May, when all contact with the hostile Indians ceased. Again, however, it was the enterprising Bradley who found the Sioux, this time on Rosebud Creek, even nearer Gibbon's location. Once again, Gibbon reported neither the Indians' harassment nor Bradley's discovery of the Rosebud camp. During Gibbon's movements, inclement weather had delayed the departure of Terry's column for the field. In the interim, Terry busily collected supplies and planned river transport to support his overland march. The river route was to follow the Missouri northwest, then turn southwest up the Yellowstone, and end at Glendive Depot (near present-day Glendive, Montana). At last, on 17 May, Terry's overland column departed from Fort Abraham Lincoln. His force consisted of twelve companies of the 7th Cavalry Regiment under the command of Lieutenant Colonel George A. Custer and three and one-half companies of infantry. Terry's column totaled 925 men. Through a misreading of intelligence, Terry expected to find the Indians along the Little Missouri River, far to the east of where they actually were. Discovering no Indians at the Little Missouri, he moved farther west, camping on Beaver Creek on 3 June. Here, Terry received a dispatch from Gibbon (dated 27 May) that vaguely referred to sightings of hostile Indians but gave no specific details and skeptically dealt with Bradley's discovery only in a postscript. As a result of this dispatch, Terry turned south on Beaver Creek and resolved to travel west to the Powder River. To facilitate his further movement, he instructed his base force at Glendive Depot to send a boat with supplies to the mouth of the Powder River. Reaching the Powder late on 7 June, Terry personally went downstream to the Yellowstone the next day, hoping to consult with Gibbon. He was pleasantly surprised to find several couriers from Gibbon's force at the river. Here, he finally gained the intelligence that Gibbon had not heretofore reported. Terry now took personal control of both columns. Crook's Advance to the Rosebud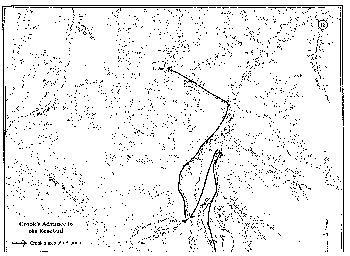 On 28 May 1876, Brigadier General George Crook assumed direct command of the Bighorn and Yellowstone Expedition at Fort Fetterman. Crook had drawn together an impressive force from his Department of the Platte. Leaving [[:Category:Fort Fetterman|Fort Fetterman] on 29 May, the 1,051-man column consisted of 15 companies from the 2d and 3d Cavalry, 5 companies from the 4th and 9th Infantry, 250 mules, and 106 wagons. Frank Grouard, an experienced scout who had worked with Crook on earlier campaigns, rode ahead of the column to recruit Crow warriors as scouts. On 2 June, in spite of the poor weather, Crook pushed his force northward to the site of Fort Reno, supremely confident that he would redress Reynolds' previous failure on the Powder River. When Crook arrived at the ruins of Fort Reno, Grouard and the scouts were absent. Many of the Crow braves had balked at serving with the Army, and only extensive negotiations and Grouard's offer of substantial rewards would eventually convince them to join Crook. The day after arriving at Reno, Crook's column headed north without the Indian allies, Lacking Grouard's guiding hand, however, the expedition soon became lost. On 6 June, mistaking the headwaters of Prairie Dog Creek for Little Goose Creek, Crook led his column to a campsite six miles from where Captain Henry E. Noyes and an advance party were waiting. The next day, Crook's command moved to the confluence of Prairie Dog Creek and the Tongue River, where it camped for the next four days. At this time, several Black Hills prospectors asked for permission to travel with Crook's column. Within a week, Crook's civilian contingent grew to approximately eighty men. On 9 June, Sioux or Cheyenne warriors raided the encampment on the Tongue. Four companies of Crook's cavalry quickly repulsed the attackers. Although Crook's casualties were insignificant, the attack was clear evidence that the Indians were in the area and prepared to fight. Finally, on 11 June, Crook led the column eleven miles back up Prairie Dog Creek, then seven miles to his original destination at the forks of Goose Creek (present-day Sheridan, Wyoming), where he established a permanent camp. As the officers and men enjoyed the excellent hunting and fishing in the area, Crook prepared for the final phase of the campaign. On 14 June, Grouard arrived with 261 Shoshone and Crow allies to join the expedition. Based on intelligence from Grouard, Crook now ordered his entire force to lighten itself for a quick march. Each man was to carry only 1 blanket, 100 rounds of ammunition, and 4 days' rations. The wagon train would be left at Goose Creek, and the infantry would be mounted on the pack mules. The infantrymen, many of whom were novice riders, received one day's training on the reluctant mules, much to the delight of the cavalry spectators. At 0600 on 16 June, Crook led his force of more than 1,300 soldiers, Indians, and civilians out of the encampment at Goose Creek. Crossing the Tongue about six miles to the north, the column proceeded downriver until early afternoon, when it turned west and crossed the divide to the headwaters of Rosebud Creek. At 1900, the lead elements of the force reached a small swampy area, near the source of the Rosebud, and bivouacked. The Battle of the Rosebud: The Sioux and Cheyenne Attack, 0800-0830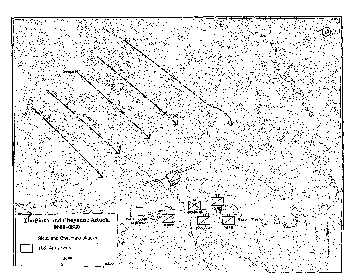 On 17 June, Crook's column roused itself at 0300 and set out at 0600, marching northward along the south fork of Rosebud Creek. The holiday atmosphere that prevailed since the arrival of the Indian scouts on 15 June was suddenly absent. The Crow and Shoshone scouts were particularly apprehensive. Although the column had not yet encountered any sign of Indians, the scouts seemed to sense their presence. The soldiers, on their part, were apparently fatigued from the previous day's 35-mile march and their early morning reveille, particularly the mule-riding infantry. At 0800, Crook stopped to rest his men and animals, Although he was deep in hostile territory, Crook made no special dispositions for defense. His troops merely halted in their marching order. The battalions of Captains Anson Mills and Henry E. Noyes led the column, followed by Captain Frederick Van Vliet's battalion and Major Alexander Chambers' battalion of mule-borne foot soldiers, Captain Guy V. Henry's battalion and a provisional company of civilian miners and packers brought up the rear. Fortunately the Crow and Shoshone scouts remained alert while the soldiers rested. Several minutes later, the soldiers in camp could hear the sound of intermittent gunfire coming from the bluffs to the north. At first, they dismissed the noise as nothing more than the scouts taking potshots at buffalo. As the intensity of fire increased, a scout rushed into the camp shouting, "Lakota, Lakota!" The Battle of the Rosebud was on. By 0830, the Sioux and Cheyenne had hotly engaged Crook's Indian allies on the high ground north of the main body. Heavily outnumbered, the Crow and Shoshone scouts fell back toward the camp, but their fighting withdrawal gave Crook time to deploy his forces. The Battle of the Rosebud: Crook's Counterattack, 0830-1000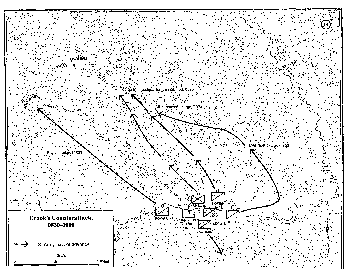 In response to the Indian attack, Crook directed his forces to seize the high ground north and south of the Rosebud. He ordered Captain Van Vliet, with C and G Companies, 3d Cavalry, to occupy the high bluffs to the south. Van Vliet scaled the hill just in time to drive off a small band of Sioux approaching from the east. In the north, the commands of Major Chambers (D and F Companies, 4th Infantry, and C, G, and H Companies, 9th Infantry) and Captain Noyes (B, E, and I Companies, 2d Cavalry) formed a dismounted skirmish line and advanced toward the Sioux, Their progress war, slow, however, because of flanking fire from Indians occupying the high ground to the northeast. To accelerate the advance, Crook ordered Captain Mills, commanding six companies (A, B, E, I, L, and M) of the 3d Cavalry, to charge this group of hostiles. Mills' mounted charge unnerved the Indians and forced them to withdraw northwest along the ridgeline, not stopping until they reached the next crest (now called Crook's Ridge). Here, Mills quickly re-formed three of his mounted companies (A, E, and M) and led his troopers in another charge, driving the Indians northwest again to the next hill (Conical Hill). Mills was preparing to drive the Indians from Conical Hill when he received orders from Crook to cease his advance and assume a defensive posture. Chambers and Noyes now led their forces forward in support and, within minutes, joined Mills on top of the ridge. The bulk of Crooks command, now joined by the packers and miners, occupied Crook's Ridge. Establishing his headquarters there at approximately 0930, Crook contemplated his next move. Meanwhile, at the west end of the field, Lieutenant Colonel William Royall, Crook's second in command, pursued the Indians attacking the rear of Crook's camp. Leading Captain Henry's battalion (D, F, and L Companies, 3d Cavalry) and two companies (B and I) borrowed from Mills' command, Royall advanced rapidly along the ridgeline to the northwest, finally halting his advance near the head of Kollmar Creek. Royall's detachment was now a mile from the main body and in some danger of being cut off and destroyed. Sensing this vulnerability and exploiting their superb mobility, the Sioux and Cheyenne warriors shifted their main effort to the west and concentrated their attacks on Royall's troopers. Crook, recognizing the danger, sent orders to Royall to withdraw to Crooks Ridge. Inexplicably, Royall sent only B Company to join Crook. Royall later claimed that heavy pressure from the Indians made withdrawing the entire command too risky. However, B Company's limited losses (one man wounded) belie Royall's claim. The Battle of the Rosebud: Crook's Search for the Village, 1000-1130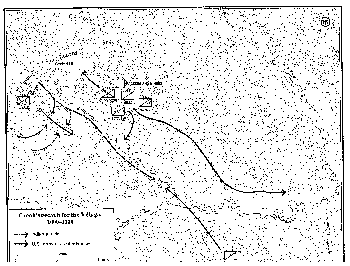 Crook's initial charges secured key terrain but did little to damage the Indian force. The bluecoats' assaults invariably scattered the Indian defenders but did not keep them away. After falling back, the Sioux and Cheyenne warriors returned to snipe at the soldiers from long range. Occasionally, single warriors or small groups of Indians demonstrated their valor by charging forward and exchanging a few close-range shots with the troopers. But when pressed, the Indians sped away on their nimble ponies. Crook soon realized his charges were indecisive. Casting about for a way to defeat his elusive opponent, Crook returned to his original campaign plan. Since the Indians had been fighting him with unprecedented tenacity, it suggested that they might be fighting to defend their families in a nearby village. Thus, Crook decided to advance down the Rosebud valley where he hoped to find the hostile encampment and force the enemy to stand and fight. At about 1030, Crook ordered Mills and Noyes to withdraw their commands from the high ground and follow the Rosebud north. To replace the cavalry, Crook recalled Van Vliet's battalion from the south side of the Rosebud. One mile to the west, Royall's situation continued to deteriorate. Royall tried to withdraw across Kollmar Creek but found the Indians' fire too heavy. Instead, he withdrew southeast along the ridgeline. In an attempt to further isolate and overwhelm Royall's force, a large group of Indians charged boldly down the valley of Kollmar Creek, advancing all the way to the Rosebud. The fortuitous arrival of Van Vliet's command, however, checked the Indians' advance. Crook then ordered his Crow and Shoshone scouts to charge into the withdrawing warriors' flank, throwing the hostiles into great confusion. Troubled by fire from Indians on Conical Hill, Crook ordered Chambers' infantry to drive the Sioux away. The foot soldiers promptly forced an enemy withdrawal-but to little avail. It was a repetition of the same old pattern; the soldiers could drive the Sioux away at will, but they could not fix and destroy them. Crook could only wait and hope that Mills' advance down the valley would be successful. The Battle of the Rosebud: The End of the Battle, 1130-1330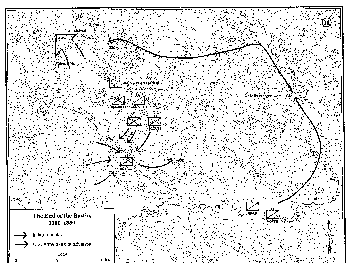 Mills' advance on the suspected Indian village did nothing to suppress the Indians. Crook's assumption about the presence of an Indian encampment proved totally false; there was no nearby Indian village. The most important consequence of Mills' action was to leave Crook without sufficient force to aid Royall and his hard-pressed battalion. While Mills made his way down the Rosebud, Royall's situation grew worse. At approximately 1130, Royall withdrew southeastward a second time and assumed a new defensive position. From here, he hoped to lead his command across Kollmar Creek and rendezvous with Crook. Meanwhile, the Sioux and Cheyenne assailed him from three sides, growing ever bolder in their attacks. Observing the situation from his headquarters, Crook realized that Royall would need help in extricating himself, help only Mills' force could provide. Consequently, Crook sent orders to Mills canceling his original mission and directing him to turn west to fall on the rear of the Indians pressing Royall. At approximately 1230, Royall decided he could wait no longer and began withdrawing his troopers into the Kollmar ravine to remount their horses. From there, his men would have to race through a hail of fire before reaching the relative safety of Crook's main position. As they began their dash, the Crow and Shoshone scouts countercharged the pursuing enemy, relieving much of the pressure on Royall's men. Two companies of infantry also left the main position to provide covering fire from the northeast side of the ravine. In spite of this gallant assistance, Royall's command suffered grievous casualties. Nearly 80 percent of the total Army losses (ten killed, twenty-one wounded) in the Battle of the Rosebud came from Royall's four companies of the 3d Cavalry (nine killed and fifteen wounded). While the last of Royall's men extricated themselves, Mills digested his new instructions from Crook, Since Mills' command had driven off a small party of Sioux near the bend in the Rosebud, it apparently led him to believe that the Indian village was nearby. But Mills' scouts were extremely reluctant to proceed. They thought that the narrow valley of the Rosebud was an ideal ambush site and predicted disaster if the column continued northward. Crook's new orders ended the controversy. Mills climbed out of the canyon and proceeded westward toward Conical Hill. Mills arrived too late to assist Royall's withdrawal, but his unexpected appearance on the Indians' flank caused the Sioux and Cheyenne to break contact and retreat. Concentrating his mounted units, Crook now led them up the Rosebud in search of the nonexistent Indian village. Again, the scouts refused to enter the narrow canyon, forcing Crook to abandon the pursuit. The Battle of the Rosebud was over. By the standards of Indian warfare, it had been an extremely long and bloody engagement. Never before had the Plains Indians fought with such ferocity, and never before had they shown such a willingness to accept casualties (estimates of Indian casualties run as high as 102 killed and wounded). Nor was their sacrifice in vain. Concerned for his wounded, short on supplies, and perhaps still shaken by the Indians' ferocity, Crook returned to his camp on Goose Creek and stayed there for seven weeks awaiting reinforcements. His command would play no role in the momentous events at Little Bighorn. Terry's Campaign, 10-24 June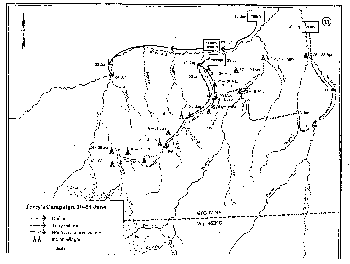 Unaware of Crook's activities but armed with the information furnished by Gibbon's messengers, Brigadier General Alfred H. Terry finally had specific, if somewhat stale, intelligence regarding the Indian locations. This new information called for new orders, which Terry issued on 10 June. Major Marcus A. Reno of Lieutenant Colonel George A. Custer's command was to take six companies of cavalry on a reconnaissance of the valleys of the Powder River, Mizpah Creek, and Tongue River. Under no circumstances was he to venture west of the Tongue so as not to alarm the Indians on Rosebud Creek, Reno was to finish his reconnaissance at the mouth of the Tongue, where he was to rejoin Custer and the rest of the 7th Cavalry Regiment. Following Reno's reconnaissance, Terry intended to drive southward in parallel columns, Custer's cavalry on the Tongue and Gibbon's predominantly infantry force on the Rosebud. After ascending the Tongue for an appropriate distance, Custer's more mobile command would turn west toward the Rosebud and descend that creek to join Gibbon's force. While Reno failed to scout all of Mizpah Creek, he essentially followed Terry's orders until 15 June. After descending the Tongue River for only eight miles, he then decided to turn west to investigate enemy signs on the Rosebud. Although he disobeyed Terry's direct instructions by advancing up the Rosebud, Reno was able to determine that Terry's plan of parallel columns would not work; the Indians had already traveled beyond the area encompassed by Terry's pincer movement. The information generated by Reno's reconnaissance caused Terry to formulate yet another plan. While all of his forces gathered at the mouth of the Rosebud, he designed a second pincer movement similar to the first. Terry's written orders provided full latitude for Custer to diverge from them; paradoxically, they also enumerated a specific set of instructions for Custer to follow. Whether Custer disobeyed orders is a controversy that continues to this day. Terry's orders directed Custer to ascend the Rosebud and follow the trail of the Indians. If the trail diverged from the Rosebud to the west, he was, nonetheless, to continue up that creek to ensure that the Indians would not escape to the south. Near the headwaters of Rosebud Creek, Custer was to cross the divide into the Little Bighorn River drainage. Meanwhile, Gibbon's force was to move up the Yellowstone River, turn south up the Bighorn, and establish itself at the mouth of the Little Bighorn. On 21 June, Custer departed with his regiment of 12 companies (652 men). Shortly thereafter, Terry and Gibbon led the remaining forces, 4 cavalry companies and 5 infantry companies (723 men), westward along the Yellowstone on their route to the mouth of the Little Bighorn. Each of these two columns followed Terry's plan to the letter until the evening of 24 June. Custer's Approach to the Crow's NestAt 1945 on 24 June 1876, Custer camped at the Busby, bend of Rosebud Creek. Throughout that day's march, he, his soldiers, and his scouts had seen increasing signs of the Sioux village. Still unclear was whether the Indians had continued up the Rosebud or had turned west toward the Little Bighorn River. At 2100, four Crow scouts returned to camp with news that the Sioux trail led westward out of the Rosebud valley. Custer now faced a dilemma. Terry's orders directed him to continue up the Rosebud to its head, then turn west toward the Little Bighorn. Through this maneuver, Terry intended to trap the Indians between Custer's force and Gibbon's colunm. On the other hand, continuing up the Rosebud entailed several risks: possible discovery by Indian scouts, the loss of contact with the Indian village, and the possibility of leaving Gibbon's force to fight the Indians alone. After weighing his options, Custer chose to maintain contact by following the Sioux trail over the divide. At 2120, Custer sent his chief of scouts, Lieutenant Charles A. Varnum, to a natural observation point called the Crow's Nest to pinpoint the location of the Sioux village. While Varnum was absent, Custer decided to move his column at night to the divide between the Rosebud Creek and Little Bighorn River. Then, his force would hide there throughout the day of 25 June in a small pocket nestled at the base of the Crow's Nest. That evening, he planned to approach the village, assume attack positions before dawn on 26 June, and attack the Indians at first light. At 0030 on 25 June, Custer led his soldiers out of the Busby camp toward the divide. After a slow, dusty, and disagreeable night march lasting nearly three hours, he halted his column about an hour before sunrise to cook breakfast. At 0730, Custer received a message from Varnum at the Crows Nest. Although Varnum had not personally seen signs of the Sioux village (now in the Little Bighorn valley), his Indian scouts claimed to have seen it. Unwilling to act without making his own observations, Custer and a small party left at 0800 for the Crow's Nest, while Major Reno brought the regiment forward. During Varnum's wait for Custer at the Crow's Nest, his scouts saw two groups of hostile Indians that appeared to notice Custer's column. Custer reached the Crow's Nest at 0900, but like Varnum, he was unable to identify any signs of the Sioux village, Varnum's Indian scouts, however, convinced Custer of its presence in the Little Bighorn valley. The scouts further argued that the column's movement had been compromised and that a stealthy approach to the village was now impossible. Custer adamantly rejected this advice while at the Crow's Nest, but his subsequent actions indicate he must have changed his mind by the time he rejoined the column at the foot of the peak. Custer's Approach to the Little Bighorn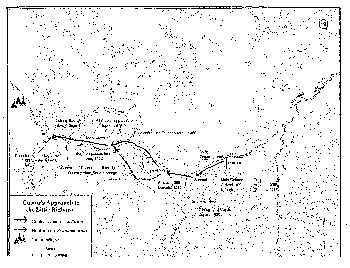 During Custer's absence, Major Reno had moved the column forward to a position just north of the Crow's Nest. Upon his return, Custer learned of a further threat to his force's security. During the night march, one of the pack mules had lost part of its load. The detail sent to retrieve it discovered several hostile Indians rummaging through its contents. The soldiers fired on the Indians, scattering them but not killing them. Coupled with the observations of Varnum's scouts, this latest breach of security forced Custer to discard his original plan for a stealthy approach. Instead of concealing his command throughout the day of 25 June, he would have to approach and attack the village immediately. Ironically, none of the Indians that spotted the column reported their findings to the village until after the battle, but Custer had no way of knowing that. At 1050, Custer gathered his officers and detailed his new plan and the organization of the column. He directed each company commander to assign one noncommissioned officer and six men to accompany the pack train. The companies would depart in the order in which they finished preparations to move. The troopers resumed their march at 1145, with Captain Frederick W. Benteen's company in the van. They had not proceeded more than one-half mile past the divide when Custer ordered another halt. There, he reorganized his command into four parts: Benteen's battalion with D, H, and K Companies (120 men); Reno's battalion with A, G, and M Companies (175 men); Custer's battalion with C, E, F, I, and L Companies (221 men); and Captain Thomas M. McDougall's augmented company with the pack train (136 men). Custer now detached Benteen, ordering him to scout southward to determine whether the Indians were escaping in that direction. As soon as Benteen concluded that the Indians were not escaping, he was to rejoin the command as quickly as possible. Meanwhile, Custer and Reno continued their advance down what is now Reno Creek, with Custer's battalion on the right bank and Reno's on the left. Benteen began his reconnaissance enthusiastically, but after crossing a series of ridges without finding any trace of the Indians, he concluded that he was being deliberately excluded from the fight. As a result, he lost his previous sense of urgency. In the meantime, Custer and Reno had proceeded down Reno Creek until they united on the right bank at a lone epee containing the body of a warrior mortally wounded in the Rosebud fight. At the tepee, Custer's scouts reported that they could see the Sioux pony herd and Indians running in the distance. At 1415, Custer and Reno departed the lone tepee location at a trot and advanced nearly three miles to a flat area between Reno Creek and its north fork. There, more Sioux were seen, two of whom rode to a hill to give the alarm. Custer now ordered Reno to follow Reno Creek to the Little Bighorn, ford the river, and assault the village in a mounted charge. Custer promised Reno that he would support the attack with the remainder of the command. After Reno's departure, Custer briefly followed Reno's trail, reaching the north fork of Reno Creek at 1500. There, he received a series of surprising reports from Reno indicating that the Indians were not running as expected. Once again, Custer was forced to revise his plans. Reno's Fight in the Valley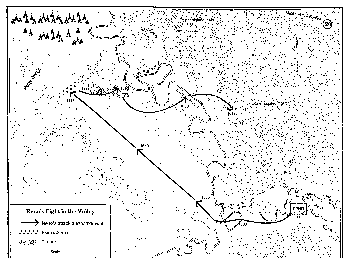 After receiving his instructions and leaving Custer for the last time, Reno recrossed to the left bank of Reno Creek and followed the stream to its confluence, with the Little Bighorn, where he briefly stopped to water the horses. Five minutes later, Reno's battalion forded the Little Bighorn and deployed into a line across the narrow, flat valley. For the first time, Reno could see the edge of what now appeared to be an enormous Indian village. At 1503, Reno, ordered his men to advance down the valley. As their horses accelerated to a fast trot, several officers and men in the advancing line could see troopers from Custer's battalion on the bluffs to the east, beyond the Little Bighorn. They could also see a swarm of Indian warriors gathering at the southern edge of the village. At the same time, Reno's Indian scouts, who initially formed the left flank of his line, veered westward toward the Indian pony herd on the bench above the Little Bighorn. Their task was to drive off as much of the herd as possible to prevent the Indians' escape. At 1513, officers and men in the charging line once again saw soldiers on the crest of the hill across the Little Bighorn. Several of Reno's men later testified that they could clearly see Custer waving his hat to the line of horsemen in the valley. Within a few minutes, Reno concluded that without immediate support, his 135-man force could not attack through the village and hope to survive. At 1518, Reno ordered his men to dismount and form a skirmish line. One of every four troopers was designated to hold the horses. While the horses were secured in a stand of timber on the right flank of the line, the remaining 95 men spread 400 yards across the valley to the low bluff on the west. Within minutes, the entire line was under pressure from hundreds of warriors spilling out of the village. Soon the troopers were outnumbered five to one. Threatened with being flanked on his, left, Reno at 1533 ordered the line to withdraw into the timber. In the trees, Reno tried to form a perimeter, but he found that the area was too large for his small command to secure. By this time, his men were also running low on ammunition, and the only remaining supply was with the horses. The Indians now threatened to surround Reno and soon set the woods afire. In response, Reno ordered his men to mount and move upstream where they could cross to high ground on the east bank. At 1553, Reno led the retreat out of the timber, but the movement quickly degenerated into a rout. Many men did, not receive the order or were unable to withdraw and were left in the timber to fight in small pockets or hide until they could escape later. Those who made it out of the woods were forced to cross the Little Bighorn at a narrow, deep ford that caused them to cluster. Meanwhile, the Indians vigorously pressed their attack, inflicting heavy casualties on the panic-stricken soldiers struggling to reach safety beyond the river. At 1610, the first troops reached the hill that would later bear Reno's name. More than forty dead and thirteen wounded troopers attested to the bloody fighting in the valley. Seventeen officers and men remained temporarily hidden in the trees west of the river. The Defense of Reno Hill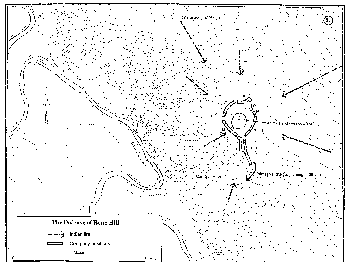 Having suffered grievous losses in the valley, Reno withdrew his men to the bluffs on the east bank of the Little Bighorn. The Sioux pursued them briefly, but by 1630, most of the warriors had broken contact with Reno and moved off to assist in destroying Custer's force. Captain Frederick W. Benteen's battalion and the pack train soon joined Reno atop the bluffs. From there, they could hear heavy and continuous firing to the north. While Reno and Benteen pondered their next move, Captain Thomas B. Weir initiated an advance by most of the command to a high point one mile to the northwest. Although this prominence (now known as Weir Point) offered an excellent view of the surrounding terrain, the cavalrymen learned little about Custer's fate. To the west, they could see the valley of the Little Bighorn filled with tepees. To the north, they could see distant hills and ridges shrouded in dust, with occasional glimpses of Indians in the dust cloud, riding about and firing. They did not realize that they were witnessing Custer's destruction. By 1710, most of the firing had ceased. Now dust clouds appeared all over the area as the Sioux and Cheyenne warriors converged on the remainder of the 7th Cavalry. With K Company acting as the rear guard, the column fell back to its original position on the bluffs and formed a perimeter defense. Animals and wounded men were gathered in a circular depression in the center of the position. The Indians rapidly surrounded the-bluecoats and began long-range sniping at Reno's men. While vexing, the Indians' fire caused few casualties, and the soldiers' firepower stopped all enemy charges. Darkness finally stopped the fighting at 2100. While the Indians withdrew to the village to celebrate their great victory, the troopers strengthened their position with improvised tools. This day's action followed the same pattern as that of the previous day, The Indians continued their long-range sniping, supplemented by occasional charges. This time, Indian fire inflicted considerably more casualties. (On the hill, Reno lost forty-eight men killed and wounded on the 26th, compared to just eleven on the 25th.) Improved Indian fire may have persuaded Benteen to conduct some limited counterattacks. Seeing a large band of Indians massing near the south end of his position, he led H Company in a charge that quickly scattered the attackers. Benteen then persuaded Reno to order a general advance in all directions, This attack also succeeded in driving the Indians back and gained some relief from enemy fire, But the relief was only temporary. As the sun rose and the day grew warmer, the lack of water became a serious problem, especially for the wounded men lying without cover in the hot Montana sun. A plea from Dr. Henry R. Porter, the 7th Cavalry's only surviving physician, prompted Benteen to seek volunteers to go for water. Covered by sharpshooters, a party of soldiers made its way down what is now called Water Carriers' Ravine to the river and succeeded in bringing water back for the wounded. By late afternoon, the Sioux and Cheyenne appeared to be losing interest in the battle. Frustrated by their inability to finish off the bluecoats and apparently satisfied with what they had already accomplished, the Indians began to withdraw. While some warriors kept the soldiers pinned down, the Indians in the valley broke camp and set the prairie grass afire to hinder pursuit. At approximately 1900, Reno's men saw the huge band move upriver toward a new campsite in the Bighorn Mountains. Although unmolested following the Indian withdrawal, Reno stayed in his hilltop position the night of the 26th. The following morning, Terry's column arrived and informed Reno and Benteen of Custer's fate. Custer's Final Approaches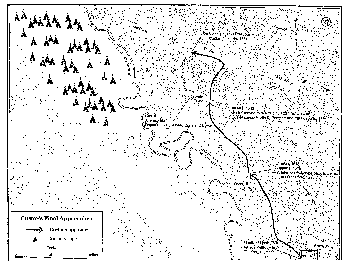 As Custer watered his horses at the north fork of Reno Creek, he confronted an altered situation, From the orders he had given Reno, it appears that he had originally intended to reinforce Reno's charge in the valley. Now that he knew the Indians were fighting, not running, he may have felt he needed to support Reno by attacking the Sioux village from a different direction. While he hoped at any moment to see Benteen's command riding into sight, the urgency of the situation meant he could not wait. Consequently, Custer turned his battalion northwest to follow the bluff line on the right bank of the Little Bighorn River. Apparently, he was seeking access to the river farther downstream in order to make a flank attack on the village. Custer's force climbed to the crest of Reno Hill, where he gained his first glimpse of the valley. He could see Reno's command still making its charge and could view the southern edge of the largest Indian village any of the veteran soldiers had ever seen. In fact, the village contained up to 1,000 lodges and 7,120 people, including 1,800 warriors. The sight of so many fighting warriors convinced Custer that he needed Benteen's command and the extra ammunition on the pack train immediately. He detached Sergeant Daniel Kanipe to Benteen with the message to move the train hurriedly cross-country: "If packs get loose, don't stop to fix them, cut them off. Come quick. Big Indian camp." But he had no time to wait for Benteen and the pack train; he had to continue his trek northwest. Just beyond Reno Hill, he descended into Cedar Coulee, still attempting to gain access to the river and hoping that his approach would be shielded from the Indians' view. Halting the command at a bend in the coulee, Custer rode to the crest of Weir Point with several scouts, including Mitch Boyer and the Indian, Curly. From Weir Point, the small party could see that Reno's command had dismounted and was forming a skirmish line. If Reno could hold his position, Custer's command might gain enough time to become engaged. From Weir Point, Custer could also see that Cedar Coulee joined another ravine (Medicine Tail Coulee) that would at last give him access to the river. Leaving Curly and Boyer on Weir Point to watch Reno's fight, Custer rejoined his command. After sending a trumpeter, John Martin, with another message for Benteen to bring the ammunition packs forward, he led the command down Cedar Coulee and into Medicine Tail Coulee. After Custer's departure from Weir Point, Curly and Boyer saw Reno's skirmish line defeated and driven into the woods. Knowing the importance of this information, the two scouts descended Weir Point to rendezvous with Custer's column. On learning of Reno's defeat in the valley, Custer was forced to change plans yet again. Without Benteen or the ammunition packs, he had to attack now to relieve the pressure on Reno's command. Custer's Last Stand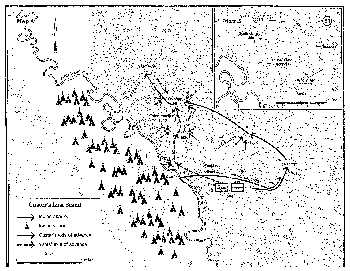 Having learned from Boyer and Curly that Reno's force was in serious trouble, Custer knew that he had to act immediately. Apparently intending to distract the Indians at his end of the village, Custer split his battalion into two parts: E and F Companies (76 men) under the command of Captain George W. Yates and C, I, and L Companies (134 men) under Custer. He sent Yates' command down Medicine Tail Coulee to the ford to make a feint against the village. Custer led the remainder of the force up the north side of Medicine Tail Coulee to Luce Ridge (see map A). From there, Custer's three companies could support Yates should he get into serious trouble, and at the same time, Custer could wait for Benteen's battalion and the pack train. Yates made his charge toward the river and alarmed the village. Briefly, as the Indians recovered from their surprise, Yates' command was able to fire across the river relatively unopposed. The Indians soon rallied, however, and some began to pressure Yates frontally while others ascended Medicine Tail Coulee. From his position on Luce Ridge, Custer's men poured a heavy volley of fire into the advancing warriors. As Yates began to withdraw up Deep Coulee, Custer saw the necessity of reuniting his command. While Yates ascended Deep Coulee, Custer left Luce Ridge and crossed both Nye-Cartwright Ridge and Deep Coulee to the reunion point near Calhoun Hill. After the five companies rejoined on Calhoun Hill, the pressure from the Indians intensified. At this point, Mitch Boyer convinced Curly to leave the doomed command, while Boyer stayed with Custer. After Curly's exit, descriptions of Custer's fight are necessarily conjecture. The accounts by John S. Gray offer the most reasonable hypothesis about the battle from this point and are buttressed by the physical evidence-the placement of bodies, the location of artifacts, and the terrain. Calhoun Hill was not a good defensive position. The surrounding ground was very broken, giving the Indians myriad concealed approaches from which to launch attacks. The mounting pressure on the soldiers ultimately forced them off the hill in the only reasonable direction, northwest along what is now called Custer Ridge (see map B). Lieutenant James Calhoun's L Company remained as the rear guard, enabling the rest of the command to withdraw. When it became apparent that Calhoun's men were about to be overwhelmed, Captain Myles W. Keogh's I Company turned back to reinforce them and was also overrun. The remainder of Custer's troopers reached Custer's Hill, but against such enormous odds, no amount of gallantry could have saved the command. As the Indians swarmed about Custer's small force, the intense pressure forced some of the men to withdraw southwest toward Deep Ravine, forming what has been called the south skirmish line. From there, the few remaining troopers fled in isolation and were cut down, one by one, until no one remained alive. Custer's battle was over, but the legend of Custer's last stand was only beginning. The Sioux Dispersal, July-September 1876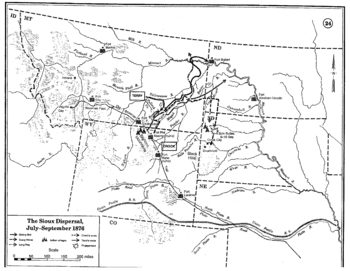 News of Custer's debacle at the Little Bighorn paralyzed Crook's and Terry's columns for over a month. The great Sioux camp dispersed shortly after the battle. Most of the bands withdrew to the southwest toward the Bighorn Mountains, satisfied with their great victory. After a few weeks of celebration in the mountains, the major bands headed northeast onto the prairie. Sitting Bull's band traveled to the northeast, Long Dog's people eventually moved northwest, and Crazy Horse's people returned eastward to the Black Hills. With the possible exception of Crazy Horse's band, which launched a few small-scale raids against miners in the Black Hills, the Sioux and Cheyenne appeared to have little interest in continuing the fight. Most of the Indians assumed that their overwhelming victory over Custer would cause the Army to give up the campaign-at least for a time. The inactivity of Crook and Terry following the battle seemed to support this view. Of course, the disaster at the Little Bighorn would have precisely the opposite effect on the U.S. Army's intentions. Both Crook and Terry called for and received substantial reinforcements. They finally got underway again in early August-but only after Indian trails in their respective vicinities had aged a month or more. On 10 August, the two forces met along the banks of the Rosebud, after initially mistaking each other for the enemy. The two commanders combined their already ponderous columns into a single expedition and proceeded northeast down the Tongue River valley. This huge host quickly exhausted its rations and halted along the Powder River to await additional supplies. With his command only partially resupplied, Crook set out due east on 22 August in one last attempt to salvage something from the campaign. By 8 September, Crook had succeeded only in exhausting and nearly starving his troopers. But on 9 September, a detachment from his column found a small Indian village at Slim Buttes and promptly attacked it. Crook's troopers inflicted few casualties but succeeded in capturing the camp and a small but welcome supply of buffalo meat. The following day, 200 to 300 warriors from Crazy Horse's band counterattacked Crook's 2,000 effectives. Although badly outnumbered, the Sioux occupied the high ground and fought Crook's exhausted men to a standstill. Following this inconclusive engagement, Crook made no effort to pursue the Indians but concentrated solely on getting his command back to a regular supply source. On 13 September, Crook finally obtained supplies from Crook City in the Black Hills, ending his men's ordeal. Meanwhile, Terry's force proceeded north to the Yellowstone, pursuing another cold trail. Terry encountered no Indians and quickly gave up the chase. A detachment under Reno briefly pursued Long Dog's band north of the Missouri but soon abandoned the effort and proceeded to Fort Buford. Perhaps the most important developments of the campaign took place far from the scene of action. Shocked by news of the Battle of the Little Bighorn, Congress passed the Sioux appropriation bill, which forced the Sioux to cede their remaining lands and withdraw to a specified reservation on the west bank of the Missouri. At the same time, General Sheridan dealt harshly with the agency Indians, confiscating all of their weapons and ponies. Without guns or horses, the agency Indians could no longer reinforce the hostile bands. Dwindling food supplies and constant harassment by the Army eventually forced the Sioux to surrender. The Final Actions, October 1876-May 1877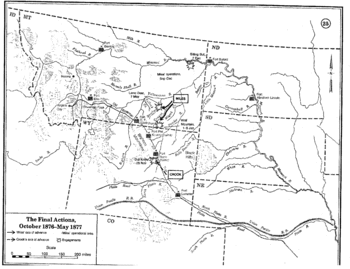 While Crook and Terry no longer pursued the Indians, Colonel Nelson A. Miles, commander of the 5th U.S. Infantry Regiment, asked for and received permission to conduct independent operations. He continued chasing the northward-bound Sioux without pause. He caught up with Sitting Bull's band in early autumn and succeeded in destroying some of its winter stores and camp equipment. The Indians now expected Miles to return to winter quarters, but he established a cantonment at the mouth of the Tongue River and harried the Sioux from this base throughout the fall and winter. Unlike other units, the soldiers of the 5th Infantry were thoroughly conditioned and equipped for their winter campaign on the harsh northern plains. Setting out on 5 November, Miles' troops began a search of the country between the Yellowstone and Missouri Rivers. Miles marched north to Fort Peck on the Missouri, then divided his command into three columns and proceeded to comb the landscape again. On 7 December, the detachment under Lieutenant Frank D. Baldwin attacked Sitting Bull's force and drove it across the Missouri. To escape Miles and his inexhaustible "walkaheaps," Sitting Bull and Long Dog led their people into Canada. While Miles harassed the northern bands, Crook launched a new expedition from Fort Fetterman on 14 November. With over 2,000 Regulars and 400 Indian scouts, he proceeded northward and located Dull Knife's Cheyenne village at the base of the Bighorn Mountains. On 25 November, Crook's men attacked the village, achieving complete surprise. The Cheyenne fled for their lives, leaving their ponies, teepees, and food. Having exposed the Cheyenne to the elements, Crook returned to Fort Fetterman and let freezing temperatures and starvation finish the job of subduing the hostiles. On 29 December, Miles resumed his campaign, marching up the Tongue River valley. Encountering Crazy Horse's camp on 1 January, Miles fought several skirmishes that culminated in the Battle of Wolf Mountain on 8 January 1877. While the soldiers caused relatively few casualties, they inflicted disastrous losses of food and camp equipment on the Indians. Miles and Crook spent the remainder of the winter sending messengers to Crazy Horse to persuade him to surrender. Although Crazy Horse and his band held out until spring, starvation and exposure caused many Sioux to drift back to the agencies. Miles encountered the last major group of hostiles, Lame Deer's band, on 7 May 1877, inflicting a crushing defeat on them. His troops captured nearly 500 ponies and some 30 tons of meat and killed at least 14 warriors including Lame Deer himself. Sitting Bull and his followers managed to survive in Canada for a time, but the disappearance of the buffalo had made starvation a constant threat. Finally, on 19 July 1881, Sitting Bull surrendered to the Army at Fort Buford. He continued to resist passively, however, tirelessly demanding fair and dignified treatment for his people. In 1890, Sitting Bull embraced the Ghost Dance, which gave agency authorities an excuse to imprison him. On 15 December 1890, tribal police shot and killed Sitting Bull when he and his supporters resisted arrest. Two weeks later, on 29 December 1890, the Army destroyed the last vestiges of armed Sioux resistance at Wounded Knee. The Sioux War was over. Source:
Links: |