Category:Coast Battery Design 6-4-Disappearing: Difference between revisions
Jump to navigation
Jump to search
John Stanton (talk | contribs) No edit summary |
John Stanton (talk | contribs) No edit summary |
||
| (12 intermediate revisions by the same user not shown) | |||
| Line 8: | Line 8: | ||
|width="50%"|[[Image:Fort Flagler Battery Calwell - 06.jpg|300px|thumb|left|[[Fort Flagler]], [[Battery Calwell]] Gun Emplacement #1]] | |width="50%"|[[Image:Fort Flagler Battery Calwell - 06.jpg|300px|thumb|left|[[Fort Flagler]], [[Battery Calwell]] Gun Emplacement #1]] | ||
|width="50%"|[[Image:Fort Moultrie Battery Gadsden Center.jpg|300px|thumb|right|[[Fort Moultrie]], [[Battery Gadsden]] Center Structure]] | |width="50%"|[[Image:Fort Moultrie Battery Gadsden Center.jpg|300px|thumb|right|[[Fort Moultrie]], [[Battery Gadsden]] Center Structure]] | ||
|} | |||
==Description == | |||
{{CBD6-4-D Desc}} | |||
==Usual Armament== | |||
{| border="1" cellpadding="4px" | |||
|- valign="top" style="background:LemonChiffon" | |||
! No. | |||
! Guns | |||
! Carriages | |||
|- | |||
| 5 | |||
| M1903 | |||
| M1903 | |||
|- | |||
| 1 | |||
| M1903 | |||
| M1908 | |||
|} | |||
==Rooms== | |||
{| border="1" cellpadding="4px" | |||
|- valign="top" style="background:LemonChiffon" | |||
! Magazine (2) | |||
! Central Structure (1) | |||
|- valign="top" | |||
| | |||
* 1 Powder Room | |||
* 1 Shell Room | |||
* 2 Store Rooms/Oil Rooms | |||
* 2 Store Rooms/Tool Rooms | |||
* 2 Shell Passages | |||
* 1 Connected Powder Passage | |||
* 1 Observation Station on top | |||
| | |||
* 1 Plotting Room | |||
* 1 Storeroom | |||
|} | |} | ||
[[Image:Fort Worden Battery Stoddard Plan.jpg|thumb|left|795px|[[Fort Worden]], [[Battery Stoddard]] Plan 1941]] | [[Image:Fort Worden Battery Stoddard Plan.jpg|thumb|left|795px|[[Fort Worden]], [[Battery Stoddard]] Plan 1941]] | ||
| Line 14: | Line 49: | ||
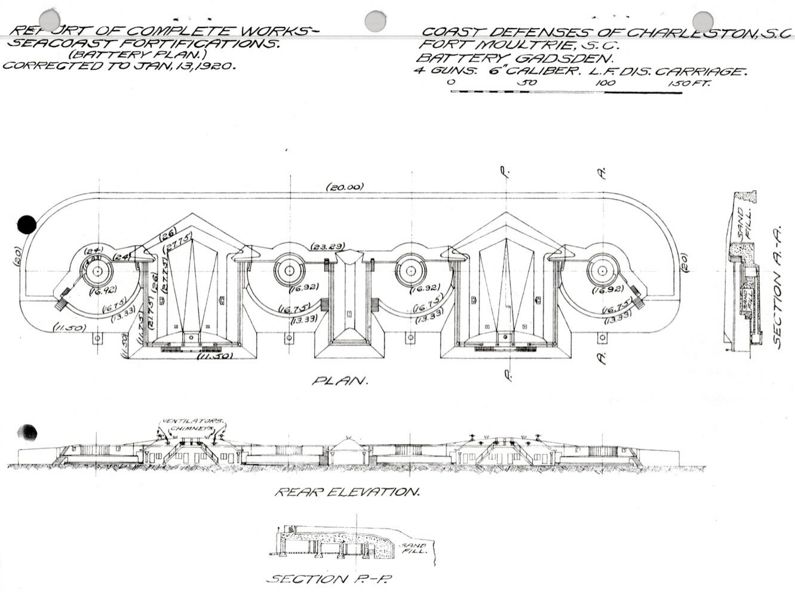
[[Image:Fort Moultrie Battery Gadsden Plan.jpg|thumb|left|795px|[[Fort Moultrie]], [[Battery Gadsden]] Plan 1920]] | [[Image:Fort Moultrie Battery Gadsden Plan.jpg|thumb|left|795px|[[Fort Moultrie]], [[Battery Gadsden]] Plan 1920]] | ||
[[Image:Fort Flagler Battery Calwell Plan.JPG|thumb|left|795px|[[Fort Flagler]], [[Battery Calwell]] Plan 1933]] | [[Image:Fort Flagler Battery Calwell Plan.JPG|thumb|left|795px|[[Fort Flagler]], [[Battery Calwell]] Plan 1933]] | ||
[[Image:Fort Whitman Battery Harrison Plan2.jpg|thumb|left|795px|[[Fort Whitman]], [[Battery Harrison]] Plan 1938]] | |||
'''Sources:''' | '''Sources:''' | ||
Latest revision as of 15:24, 30 March 2010
Coast Battery Design 6-4-Disappearing A coastal gun battery design for a 4 gun 6" battery with Disappearing carriages.
 |
 |
 |
 |
Description
This is a one story gun battery with two magazines, each serving two guns and a central multi purpose structure. Each gun and carriage sat on a raised loading platform. Shell carts were used to move the shells from the magazine to the loading platform stairs and the shells were hand carried to the loading platform. A separate powder passage was used to bring the powder from the magazine's powder room to the loading platform. No shell or powder hoists were needed or provided.
Usual Armament
| No. | Guns | Carriages |
|---|---|---|
| 5 | M1903 | M1903 |
| 1 | M1903 | M1908 |
Rooms
| Magazine (2) | Central Structure (1) |
|---|---|
|
|


Sources:
Pages in category "Coast Battery Design 6-4-Disappearing"
The following 6 pages are in this category, out of 6 total.